Using Adaptive Families for More Complex Facades
In the previous module, we leaned heavily on system families to drive relatively simple facades – think vertical glazing, modest planar bends, and regular floor-to-floor modules. System families are fantastic when the geometry is more or less behaving.
But what happens when the geometry stops behaving?
- You want a swooping facade that twists and leans.
- Panels need to follow a curved massing in multiple directions.
- You’re exploring triangles, hexagons, diagrids, or other non-rectangular panel logics.
- You want something closer to a real-world complex façade (think KPF towers in Asia, Middle East, or certain North American projects).
This is where adaptive families come in.
In this module, we’ll take the same tower logic we’ve been using and rebuild the façade using a pattern-based adaptive curtain panel placed via Grasshopper + Rhino.Inside.Revit.
1. Resetting the Model & Rhino.Inside Best Practices
We’re starting with a clean slate for this adaptive façade exercise.
Clear out system-family facade elements
Inside Revit:
- Select previous glass / curtain wall geometry
Right-click → Select All Instances → Entire Project
→ Unpin → Delete. - Do the same for slabs and any other façade elements that came from the previous module.
Close all Grasshopper definitions before editing in Revit
When a Grasshopper definition with active Rhino.Inside nodes is open:
- Revit continues trying to regenerate elements you may not want regenerated.
- Performance tanks.
- Manual edits fight your live Grasshopper logic.
Always close GH definitions when doing unrelated Revit work.
Joe’s Tip
Treat active Grasshopper definitions as live pipes into your Revit model.
If you don’t want data flowing through them, shut the pipe off, not partially.
Regenerate structure if needed
If you deleted supporting elements you want back:
- Reopen your structure-generation GH file.
- Run it again to rebuild columns, slabs, and beams.
When the structural context is ready, we move on to a brand new GH definition dedicated to adaptive components.
2. Starting a New Grasshopper Definition (Adaptive Only)
We’ll read the tower mass, extract usable vertical faces, panelize them, and convert them into adaptive panel placements.
Bring in the tower mass
- In Rhino, ensure the tower mass is on a clean layer (e.g.
DP_OVERALL_MASSING). - In Grasshopper:
- Add a Geometry Pipeline.
- Set the Layer filter to your massing.
- Set geometry type to Brep.
Deconstruct faces
- Add Deconstruct Brep → plug in the mass.
- The Faces (F) output will give you all six surfaces:
- Four vertical sides (ideally untrimmed)
- One top
- One bottom
Next, we isolate the vertical ones.
3. Identifying Vertical Facade Surfaces Using Normals
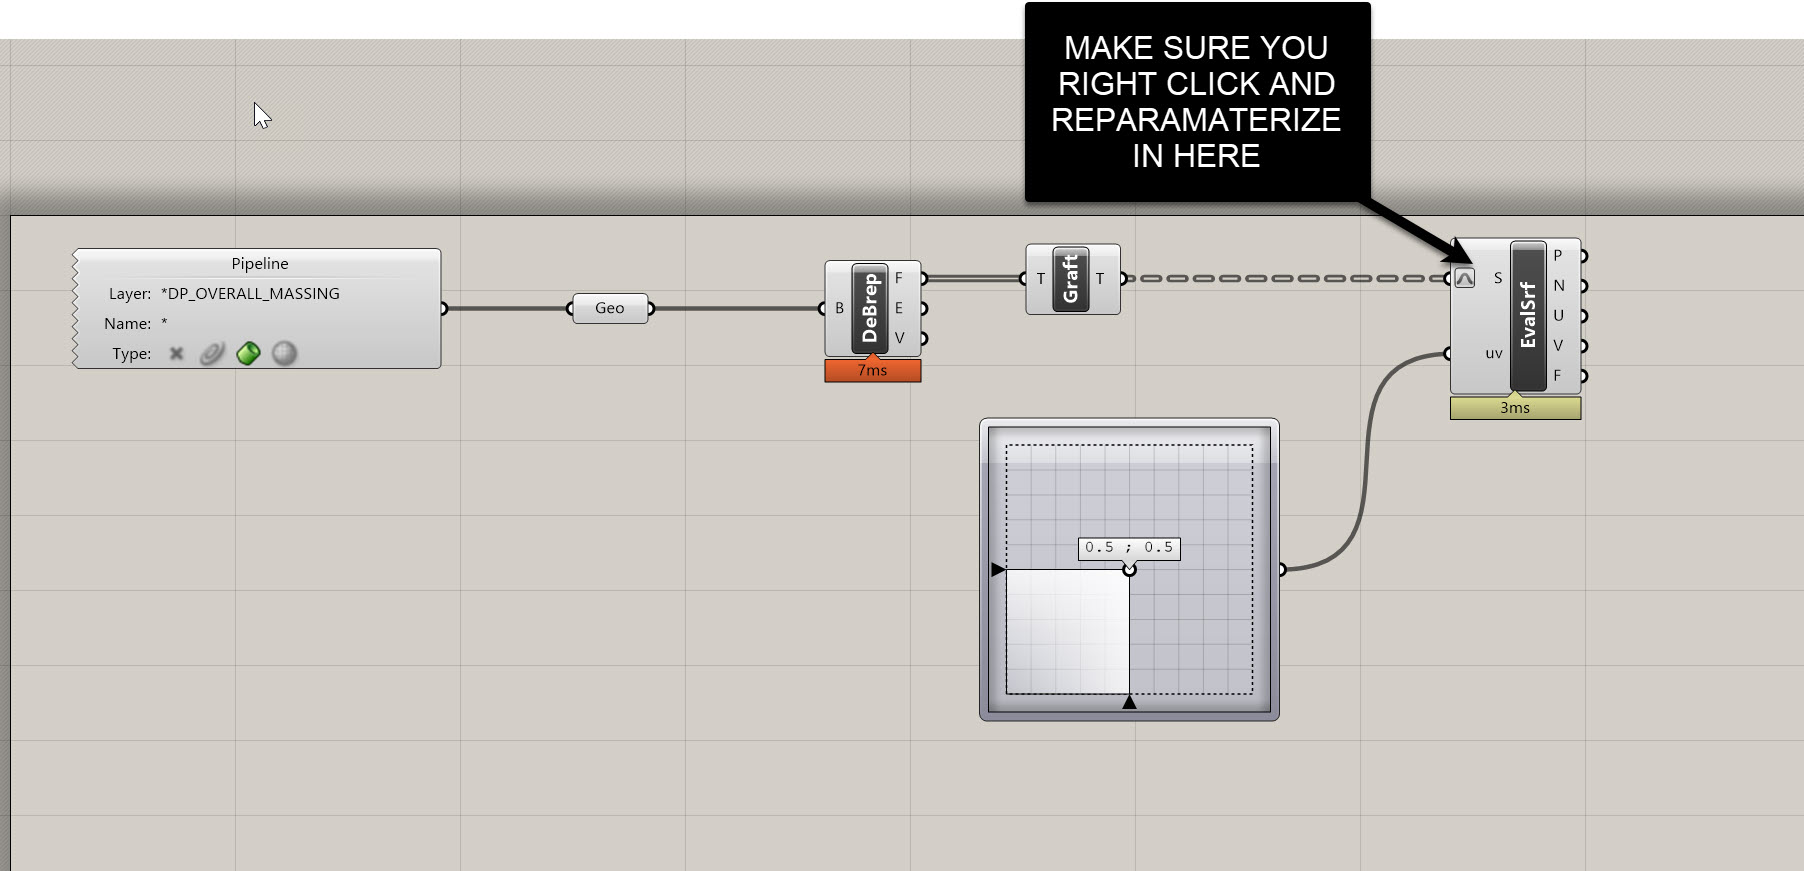
Instead of guessing or manually picking faces, we’ll classify surfaces by their normal direction.
Evaluate each surface at its center
- Add Evaluate Surface.
- Graft faces from DeBrep → plug into S.
- Add an MD Slider at (0.5, 0.5).
- Right-click S → Reparameterize.
This ensures (0.5, 0.5) = the center of each surface in U/V space.
Each face now yields a point P and a normal vector N.
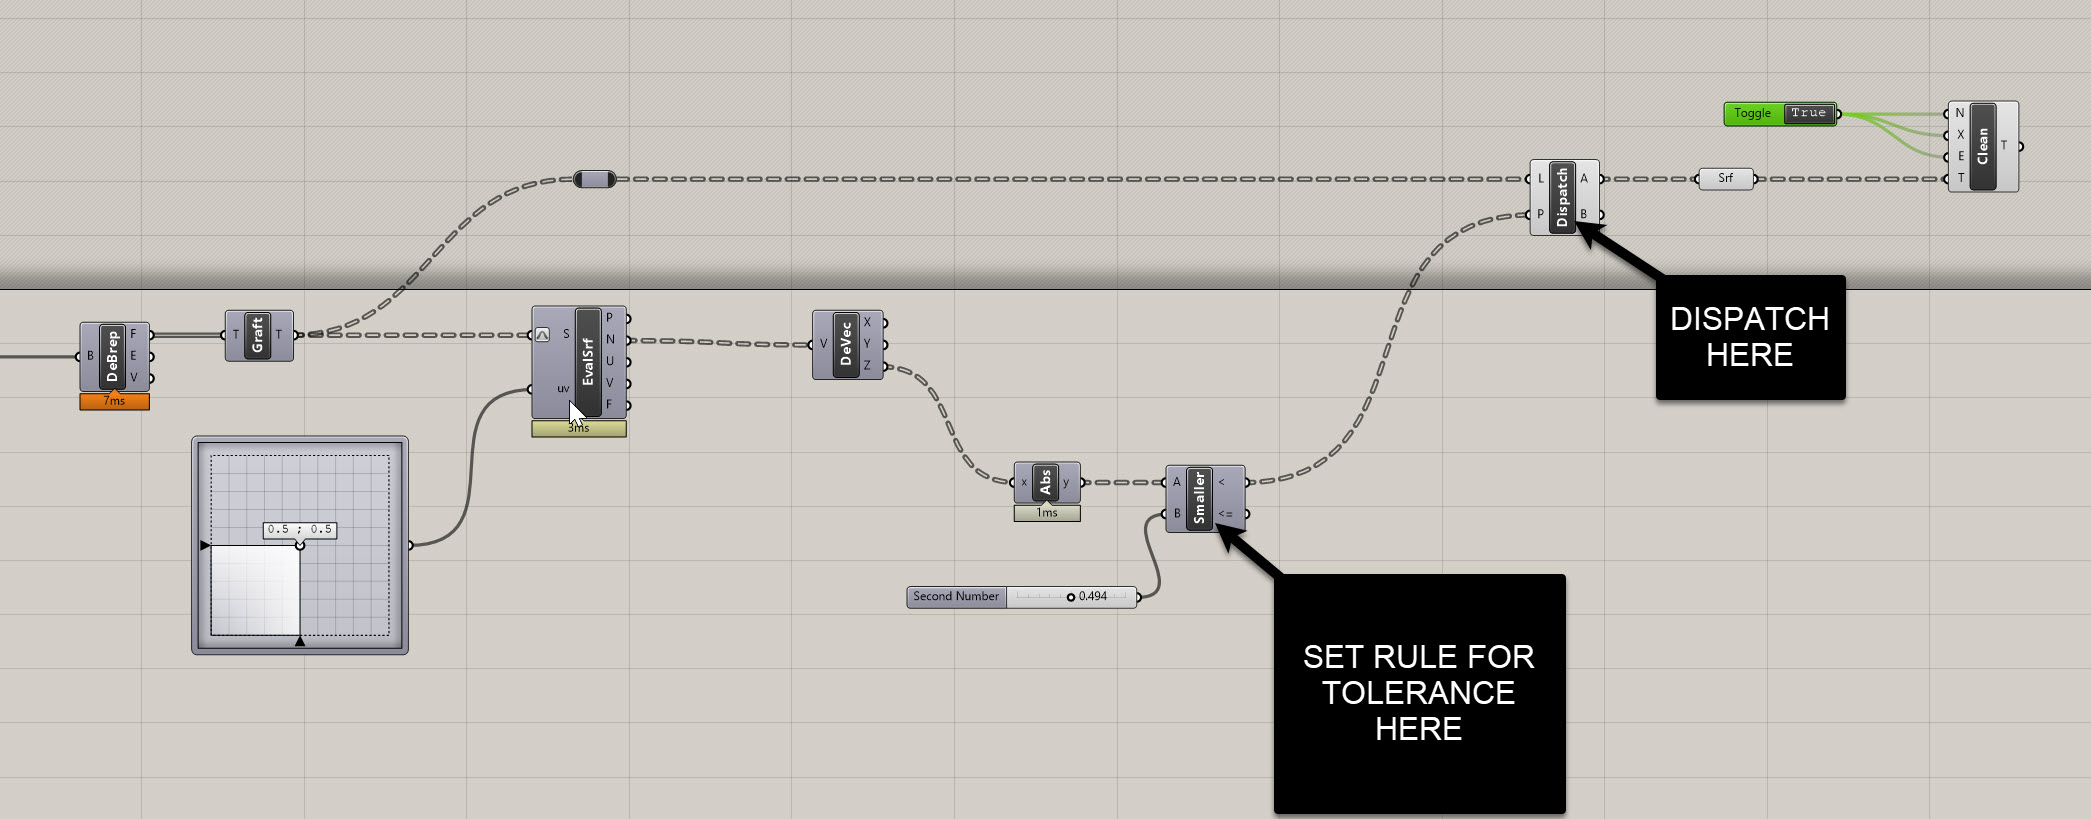
Use the Z value of the normal to classify surfaces
- Add Deconstruct Vector → plug N in.
- Take Z output.
- Add Absolute.
- Add Smaller Than (<):
- A = |Z|
- B = slider ~
0.25(tolerance for “vertical”)
This produces a True/False list.
Dispatch vertical faces
- Add Dispatch:
- List (L) = original faces
- Pattern (P) = output of
<
- Output A = vertical faces
- Add Clean Tree to remove empties.
You should now have your four clean, vertical, untrimmed tower faces.
4. Panelizing the Vertical Faces Using Lunchbox
We’ll subdivide the façade using Random Quad Panels, targeting approximate 5' × 12' modules.
Install/use Lunchbox
- Add Lunchbox → Random Quad Panels.
- Plug the vertical surfaces into S.
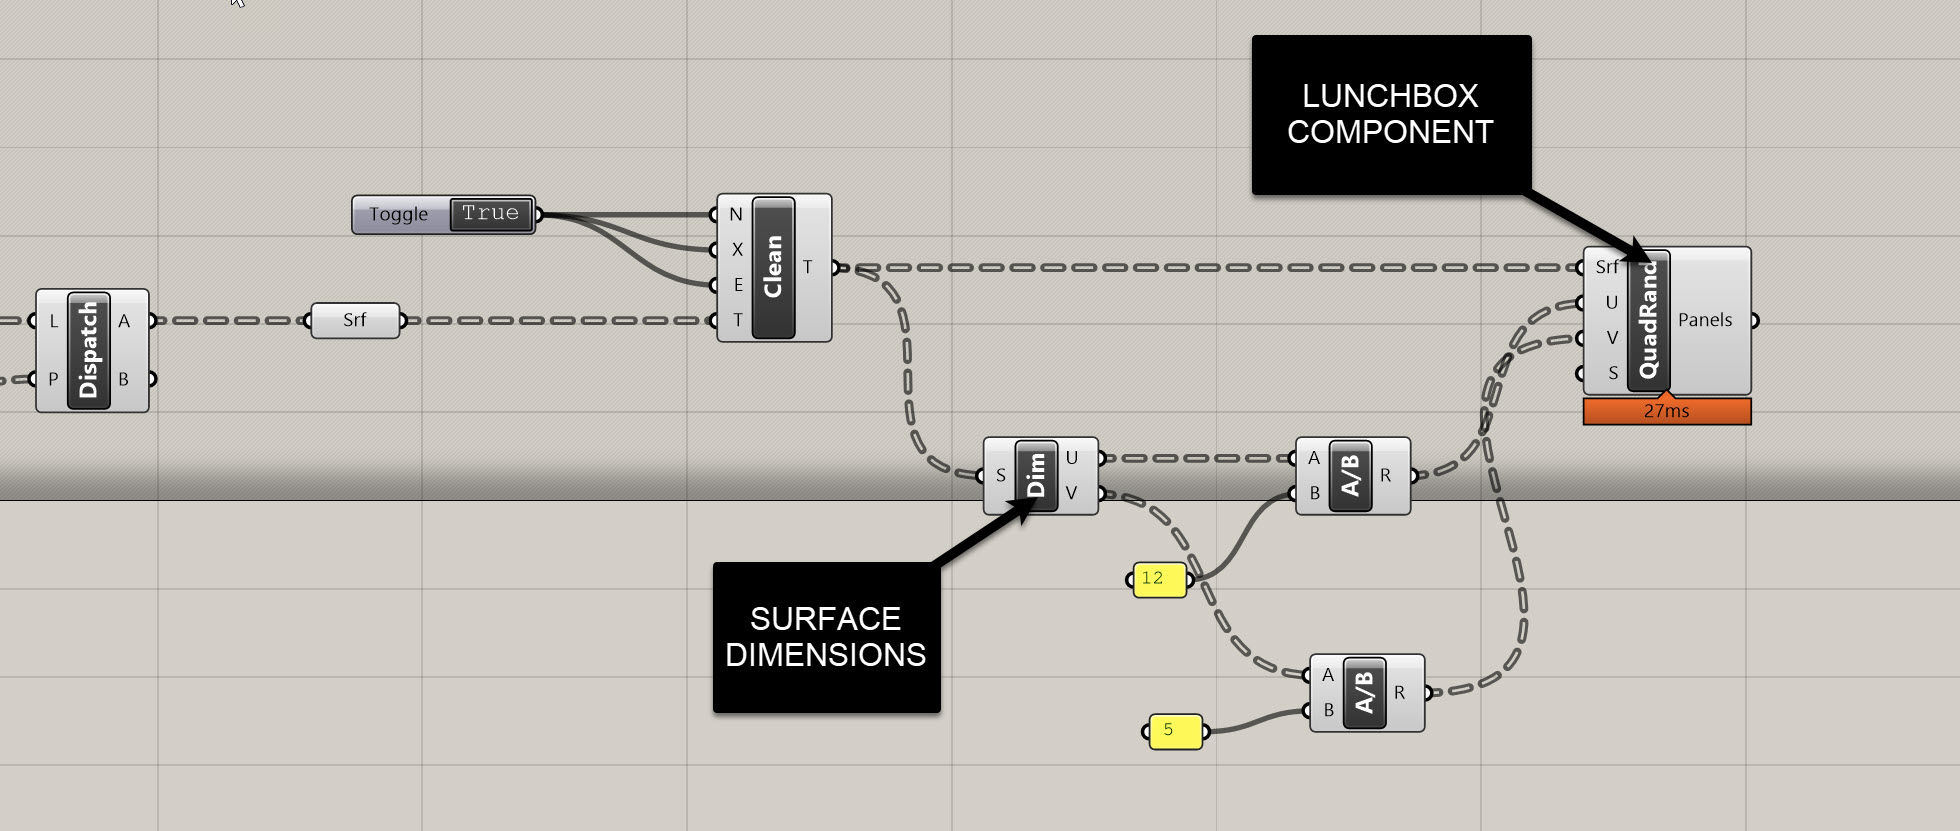
Compute panel counts from real dimensions
- Add Dimensions (Dim) → plug surfaces in.
- Divide each dimension by target sizes:
- U direction: divide by 12 ft
- V direction: divide by 5 ft
- Plug these computed counts into U and V of Random Quad Panels.
You now have a panel grid across curved surfaces.
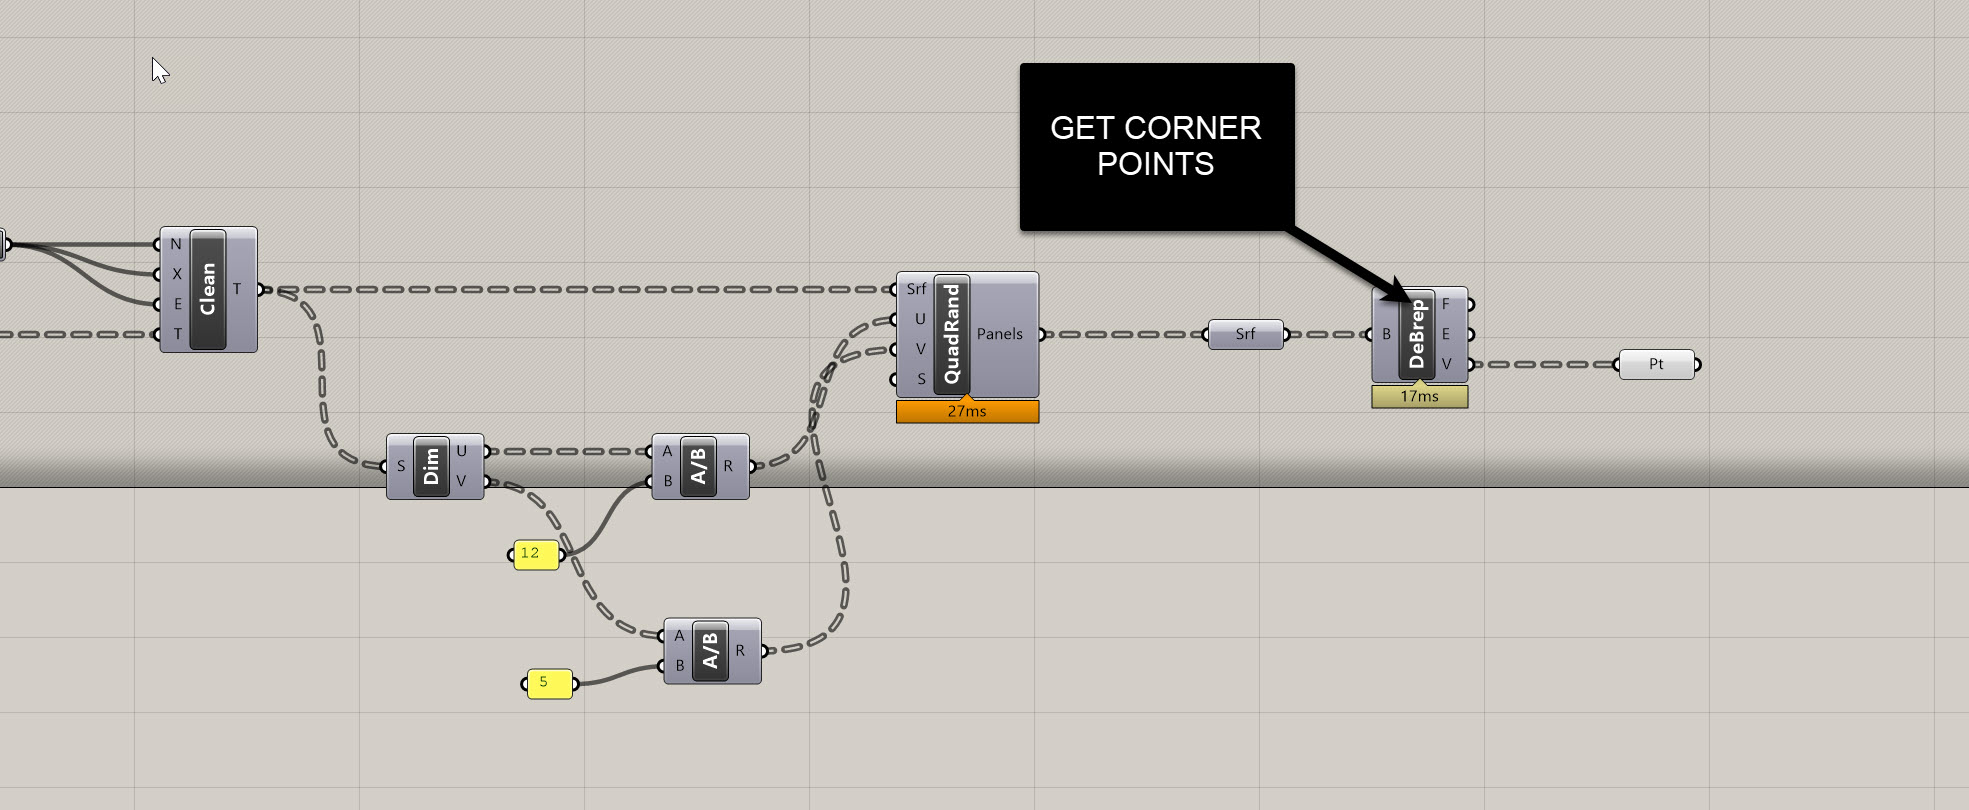
5. Extracting 4 Corner Points per Panel
The adaptive component requires ordered point sets.
- Add Deconstruct Brep after Random Quad Panels.
- Use Vertices (V):
- Each branch = panel
- Each branch contains 4 points
This is exactly what we need for adaptive placement.
If needed, reorder points (not covered here) but Lunchbox typically outputs consistent ordering.
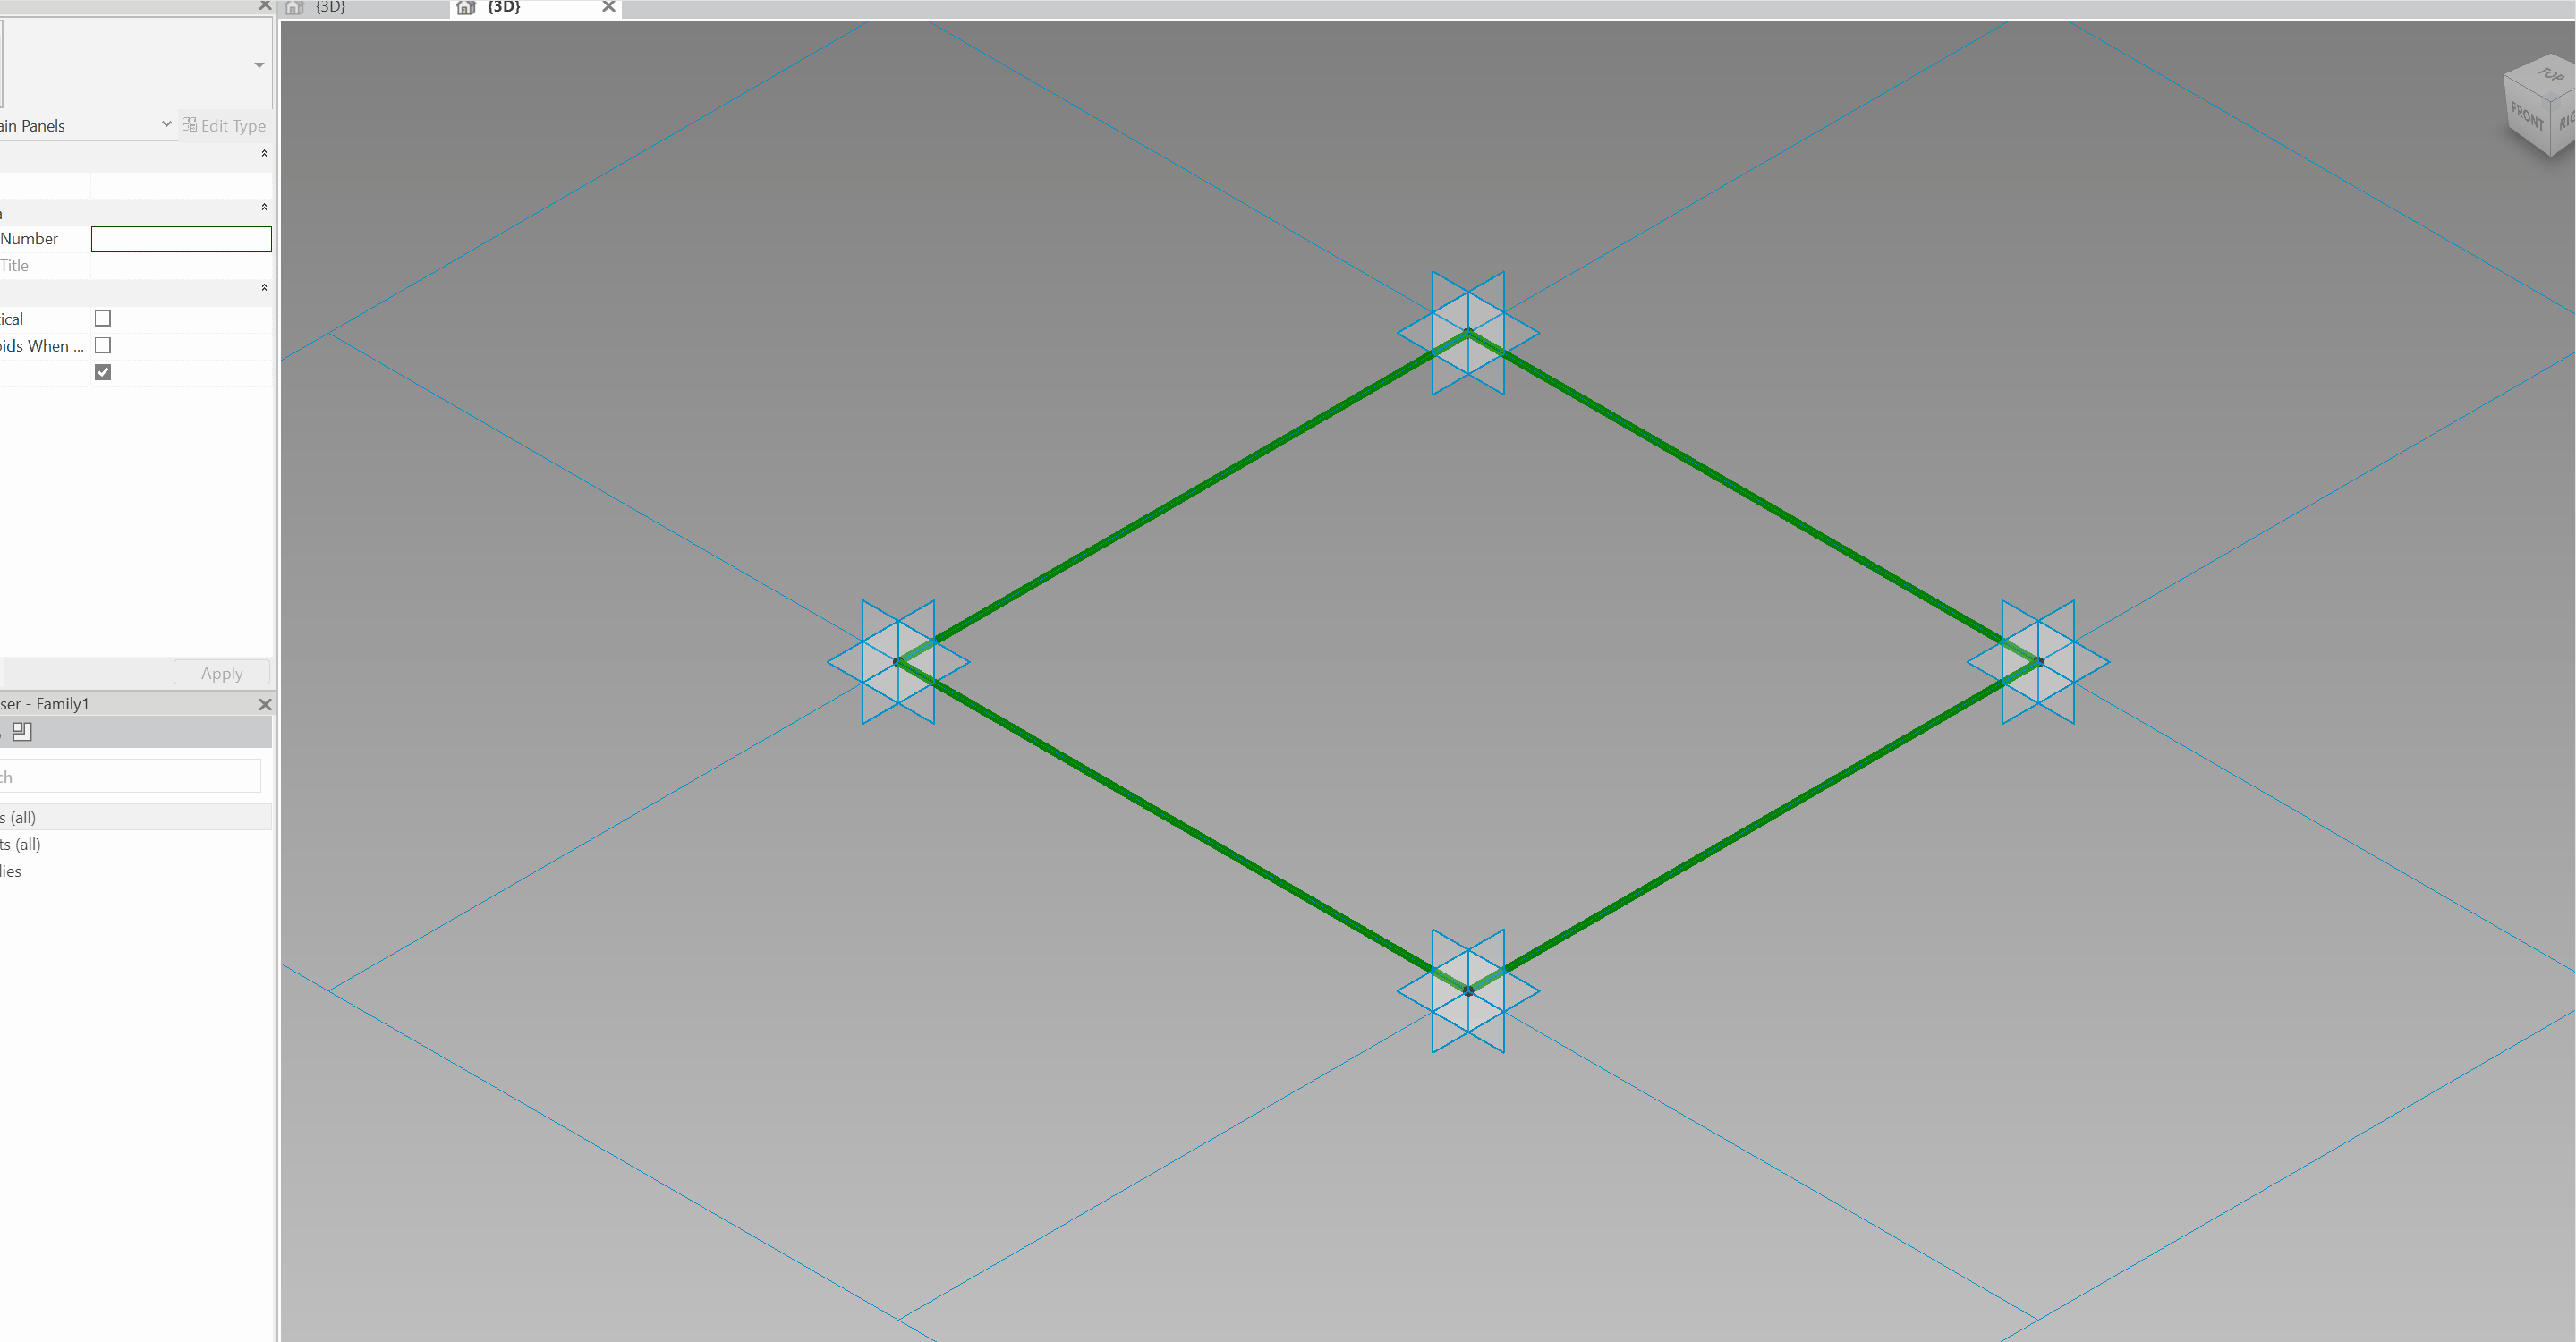
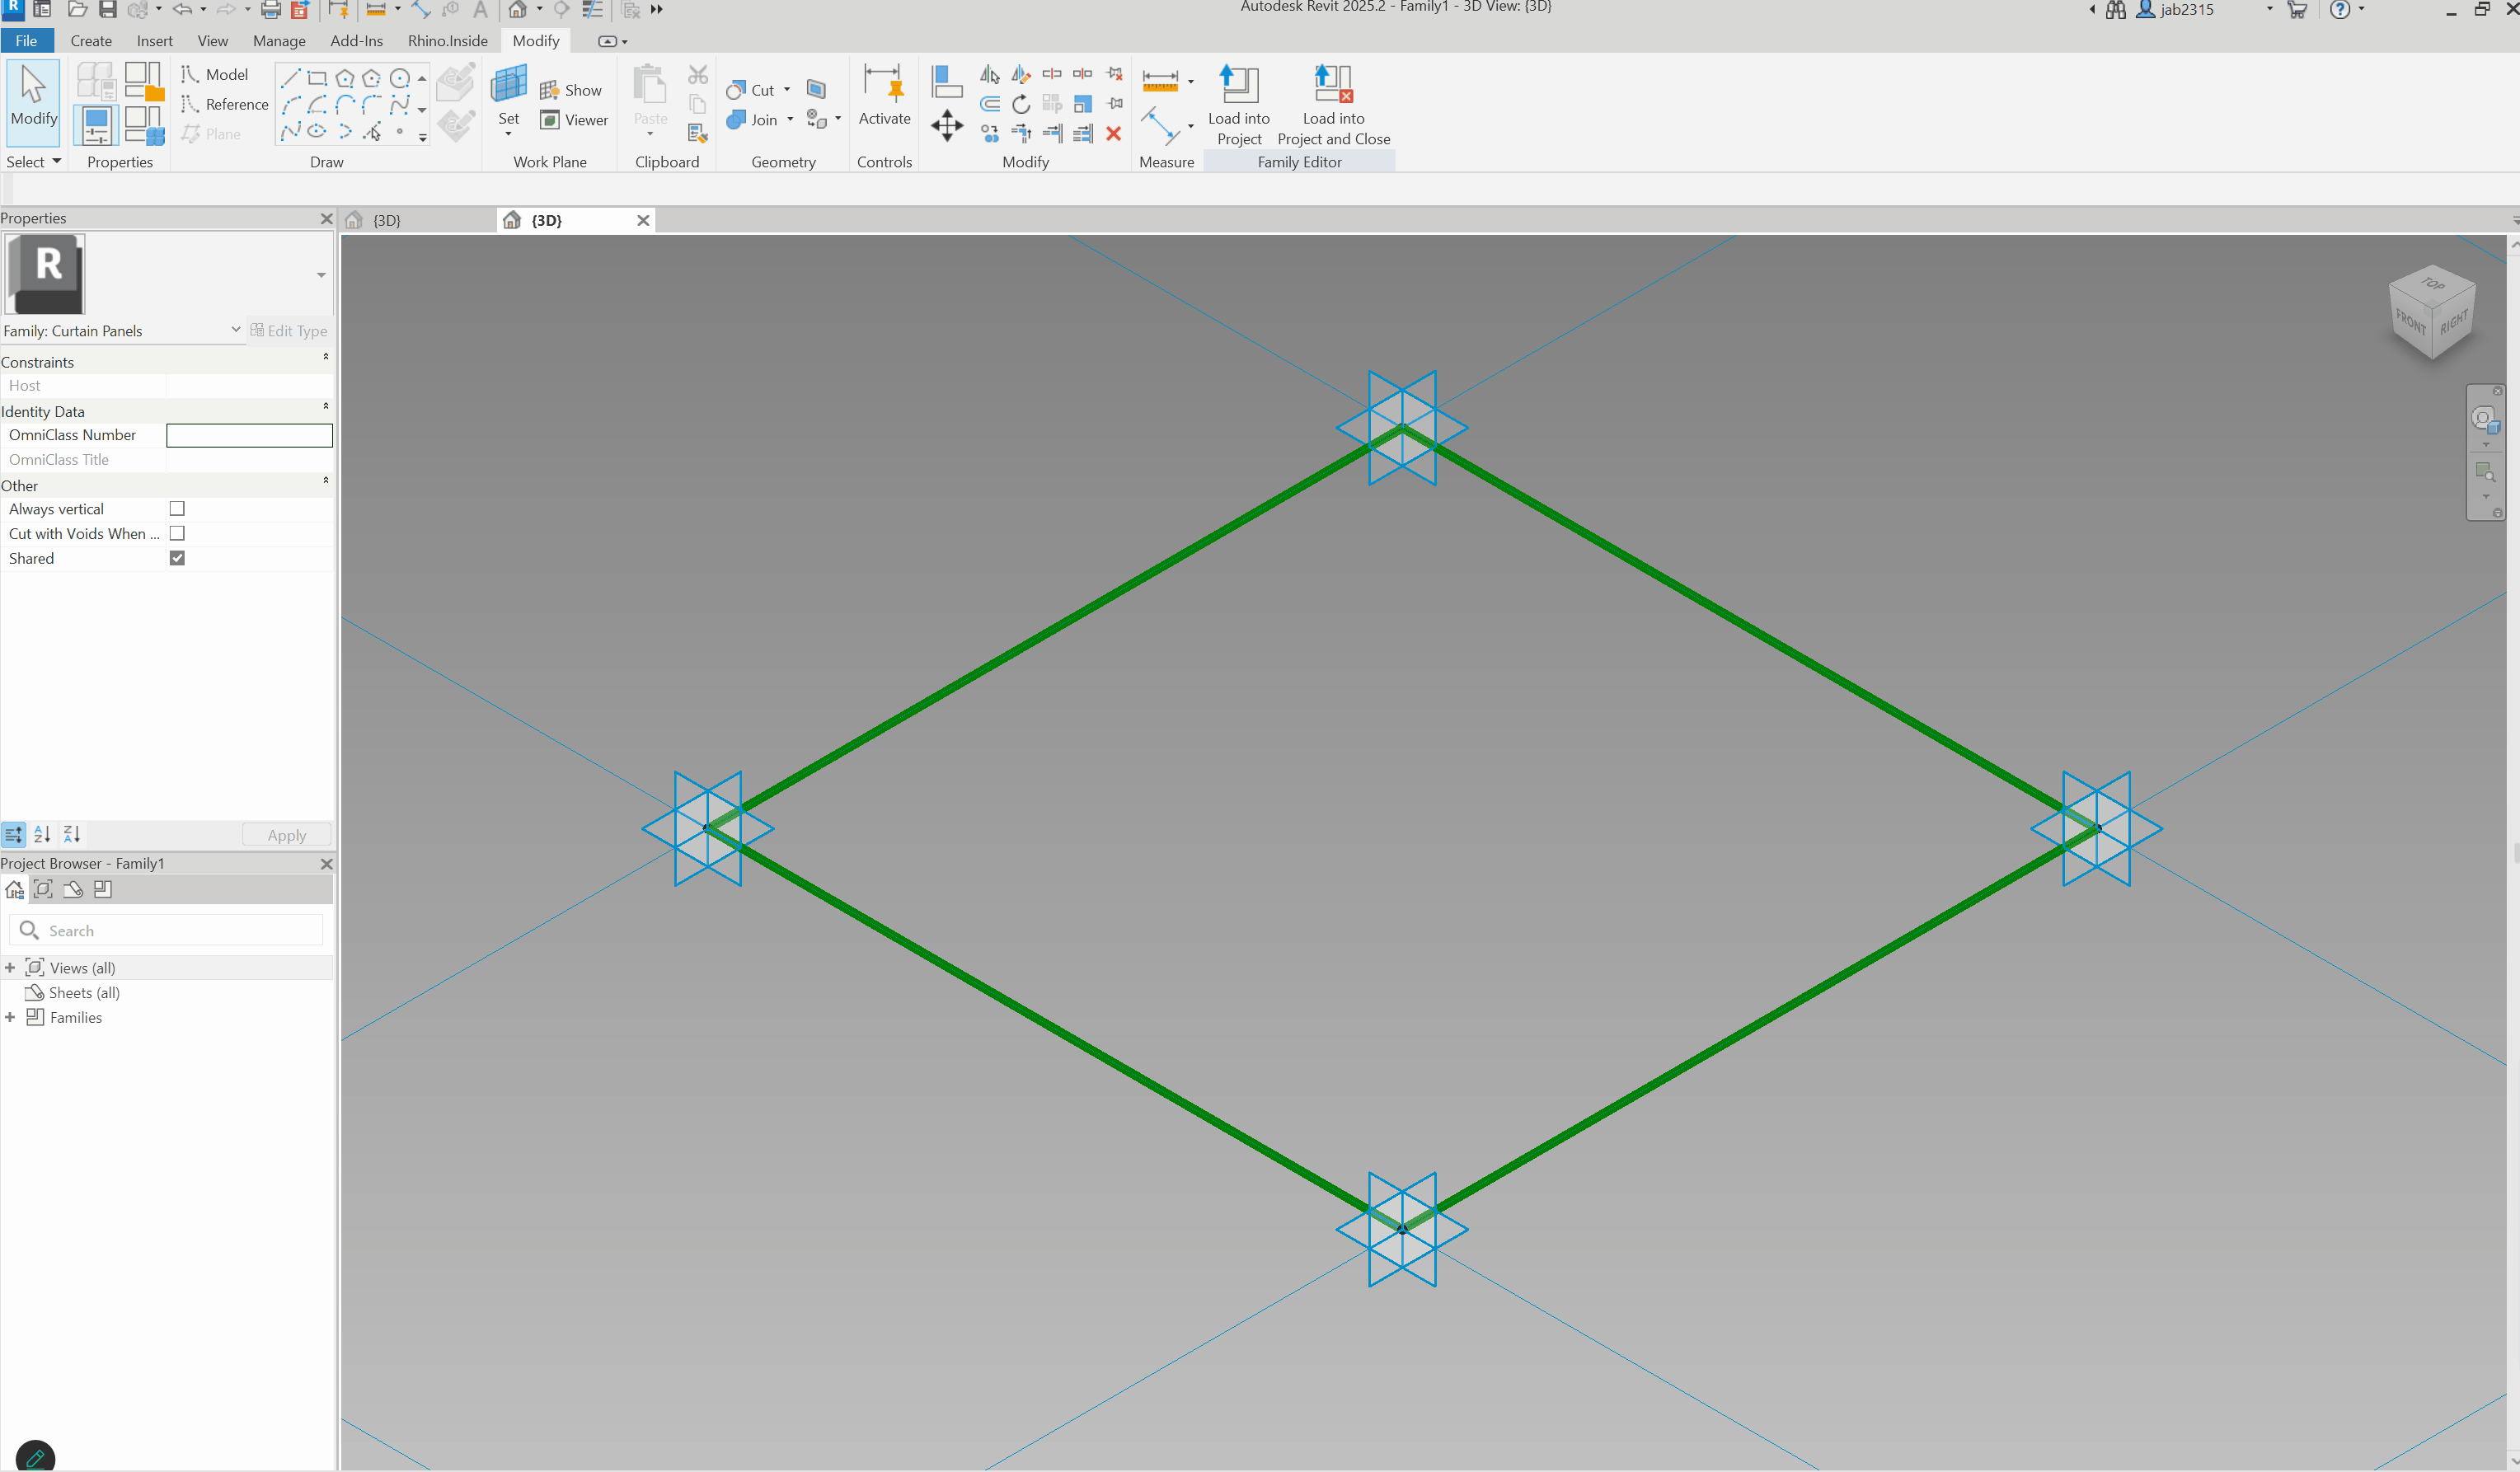
6. Building a 4-Point Adaptive Curtain Panel in Revit
Now we create the parametric panel that each point set will drive.
Create the adaptive family
- Revit → File → New → Family
- Choose Curtain Panel Pattern Based
- Template loads with 4 fixed points
Important
Grasshopper points are indexed0,1,2,3.
Revit adaptive points are1,2,3,4.
Grasshopper point 0 → Revit point 1, etc.
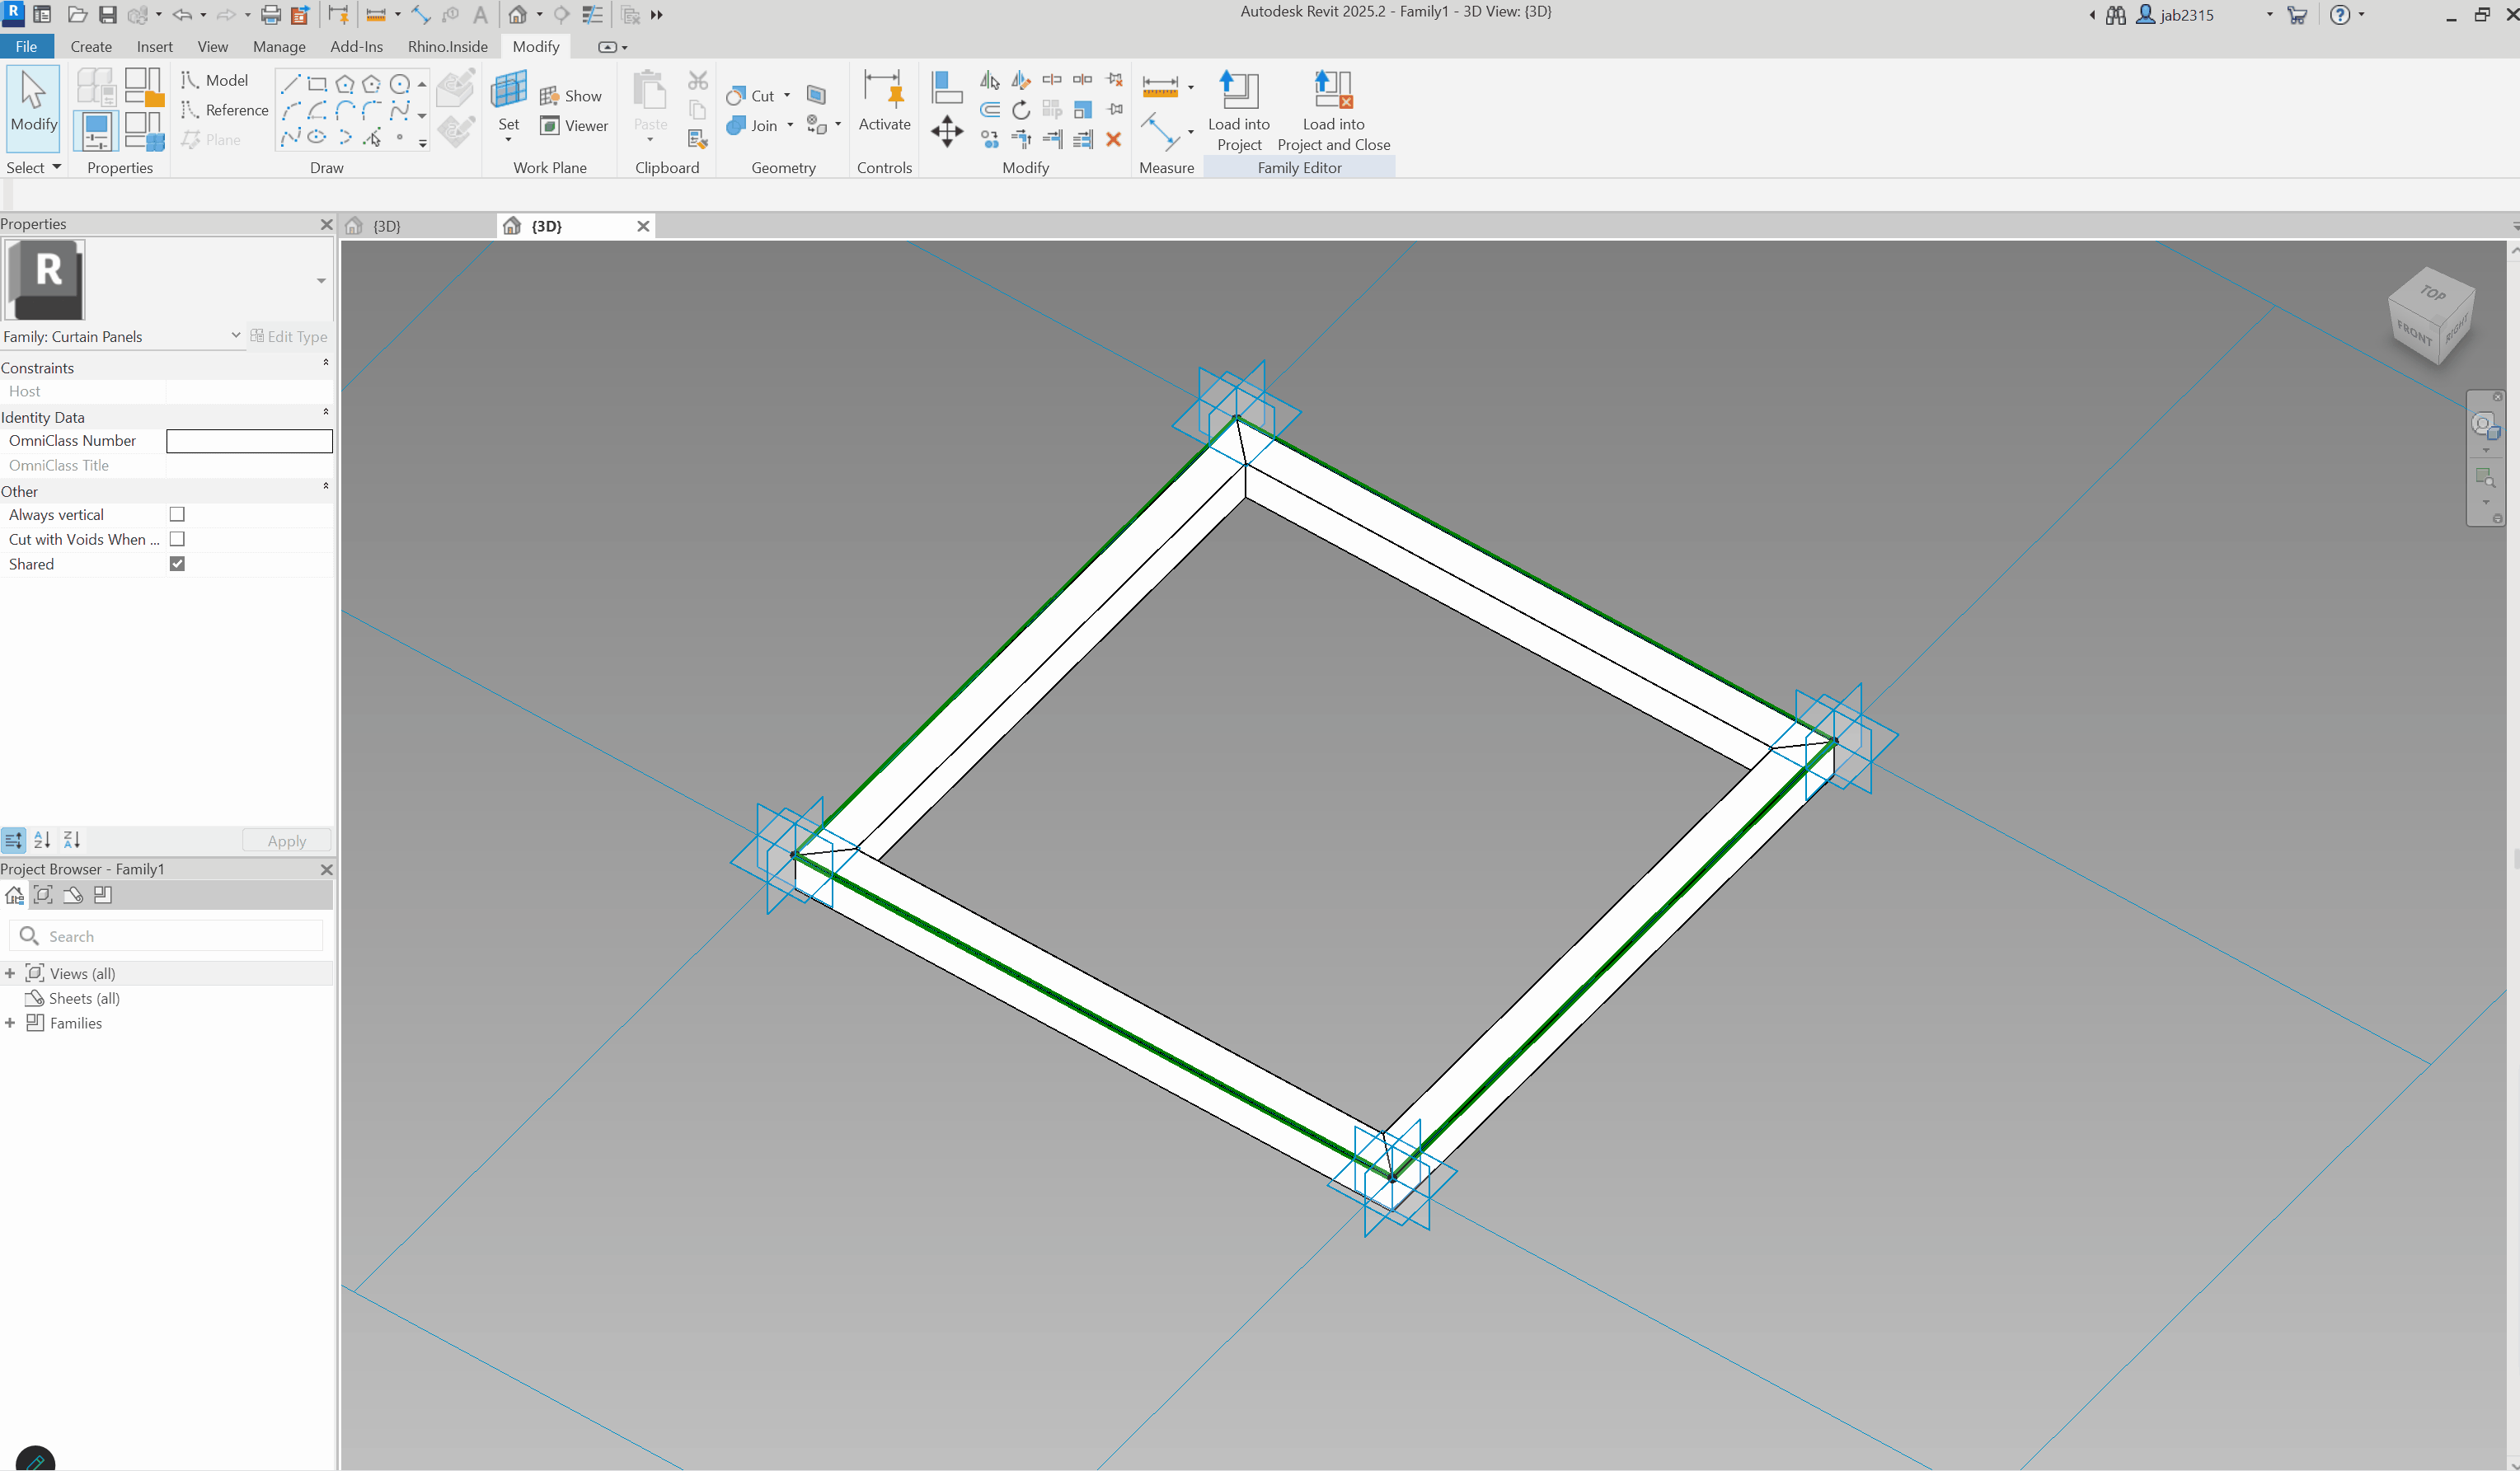
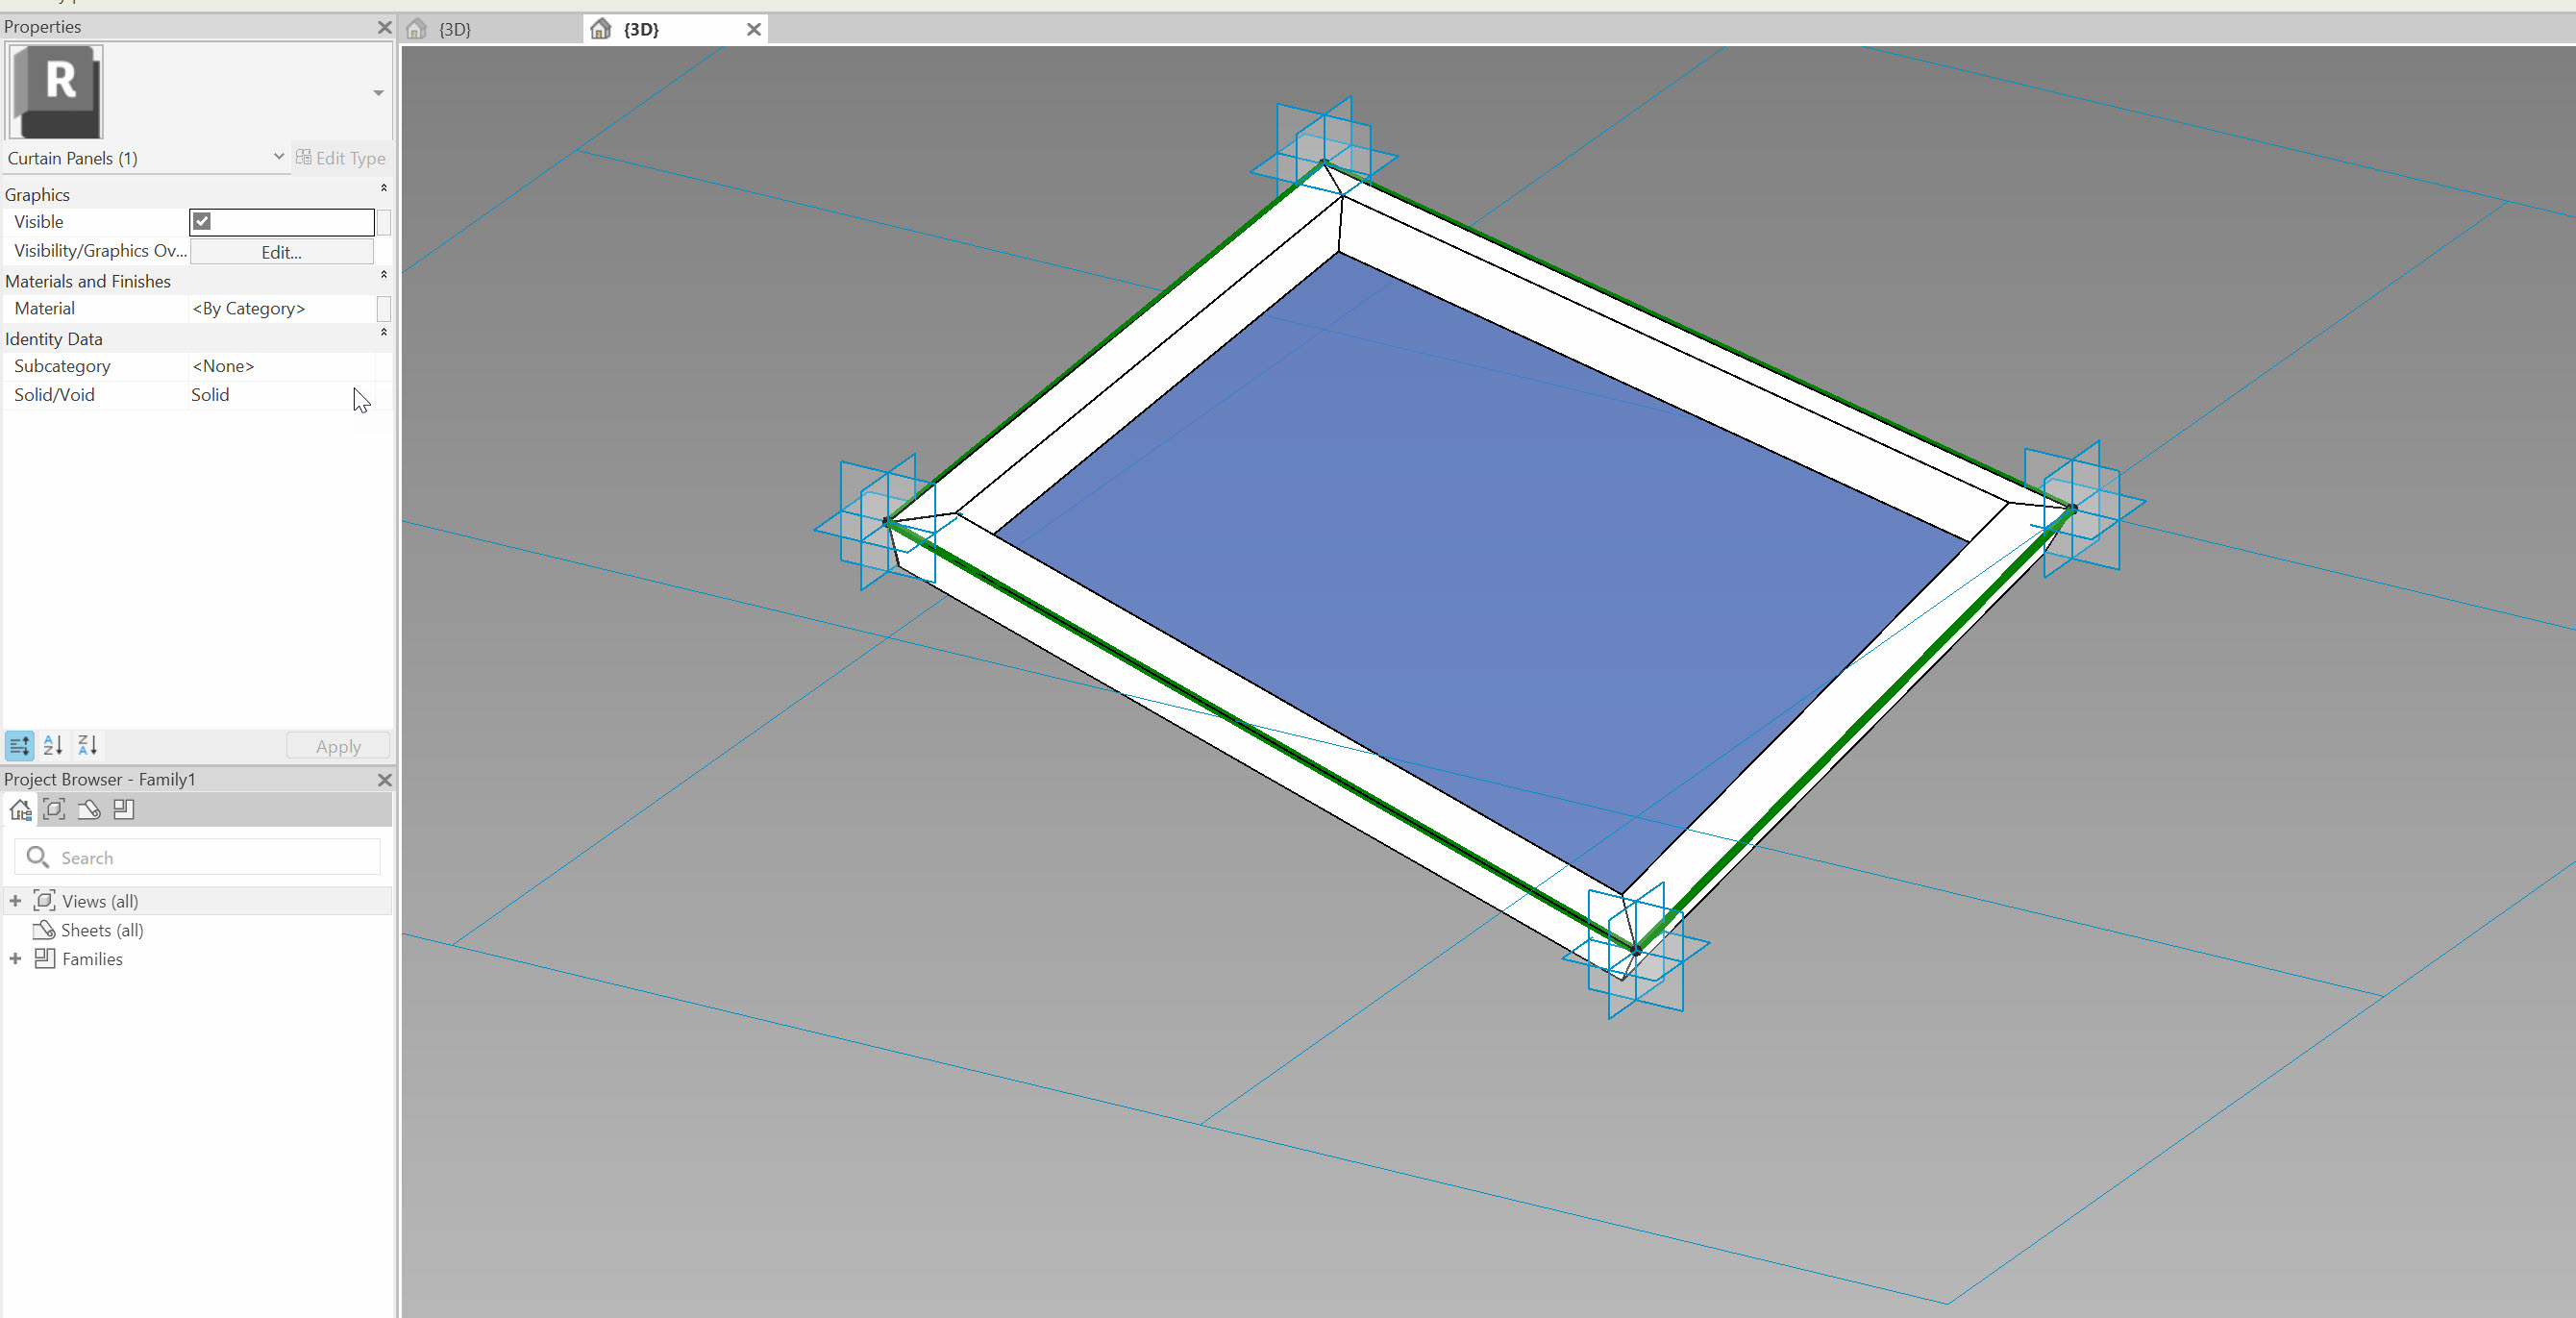
Build the panel geometry
- Tab-select the vertical reference plane.
- Draw a band / rectangle (e.g., 8" x 8") on the plane.
- Select the base green curve that was provided in the template → Create Form.
- For glass:
- Select edge curve on one side.
- Ctrl-select opposite curve.
- Click Create Form.
- Hit Spacebar until the form becomes a loft surface.
- Hit Enter.
Test by pulling adaptive points – the geometry should twist/deform.
Assign materials
- Select the glass surface → set Material = Glass.
- Select the band → assign generic solid/metal.
Save and load
Save as something like:
Adaptive.rfa
Load into your tower model.
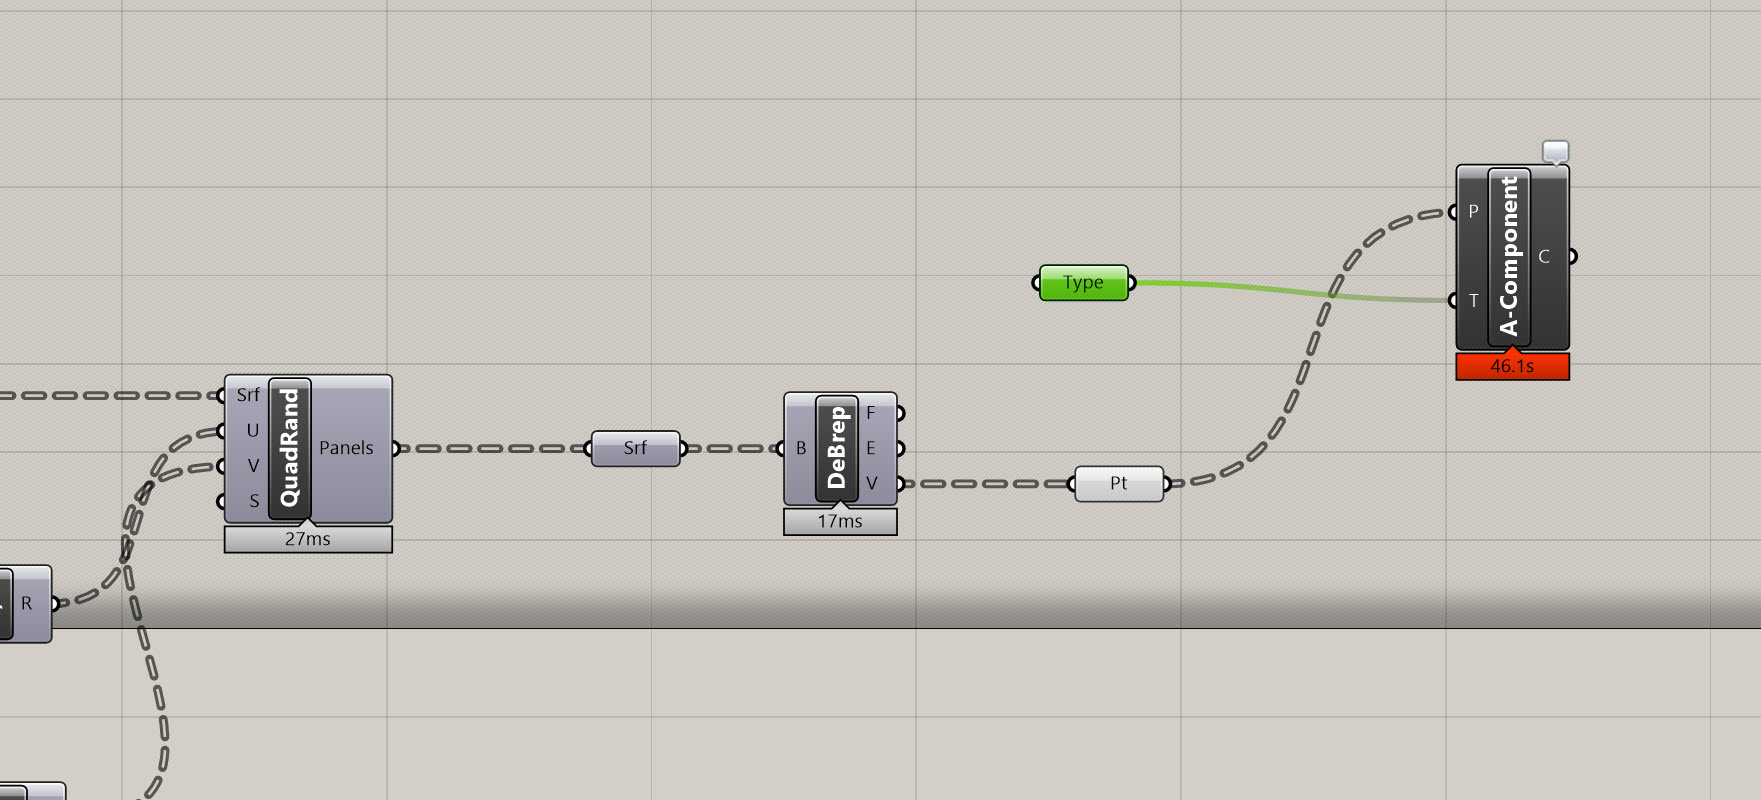
7. Deploying Adaptive Panels via Grasshopper
Add Component Adaptive
In Grasshopper:
- Add Add Component Adaptive.
- P input:
- Plug in the panel corner points (4 points per branch).
- Type input:
- Right-click → Set one Adaptive Component type
- Choose Curtain Panel → Adaptive_SwoopingPanel
Grasshopper will think for a moment.
Once the component icon turns black, all adaptive panels have been placed into Revit.
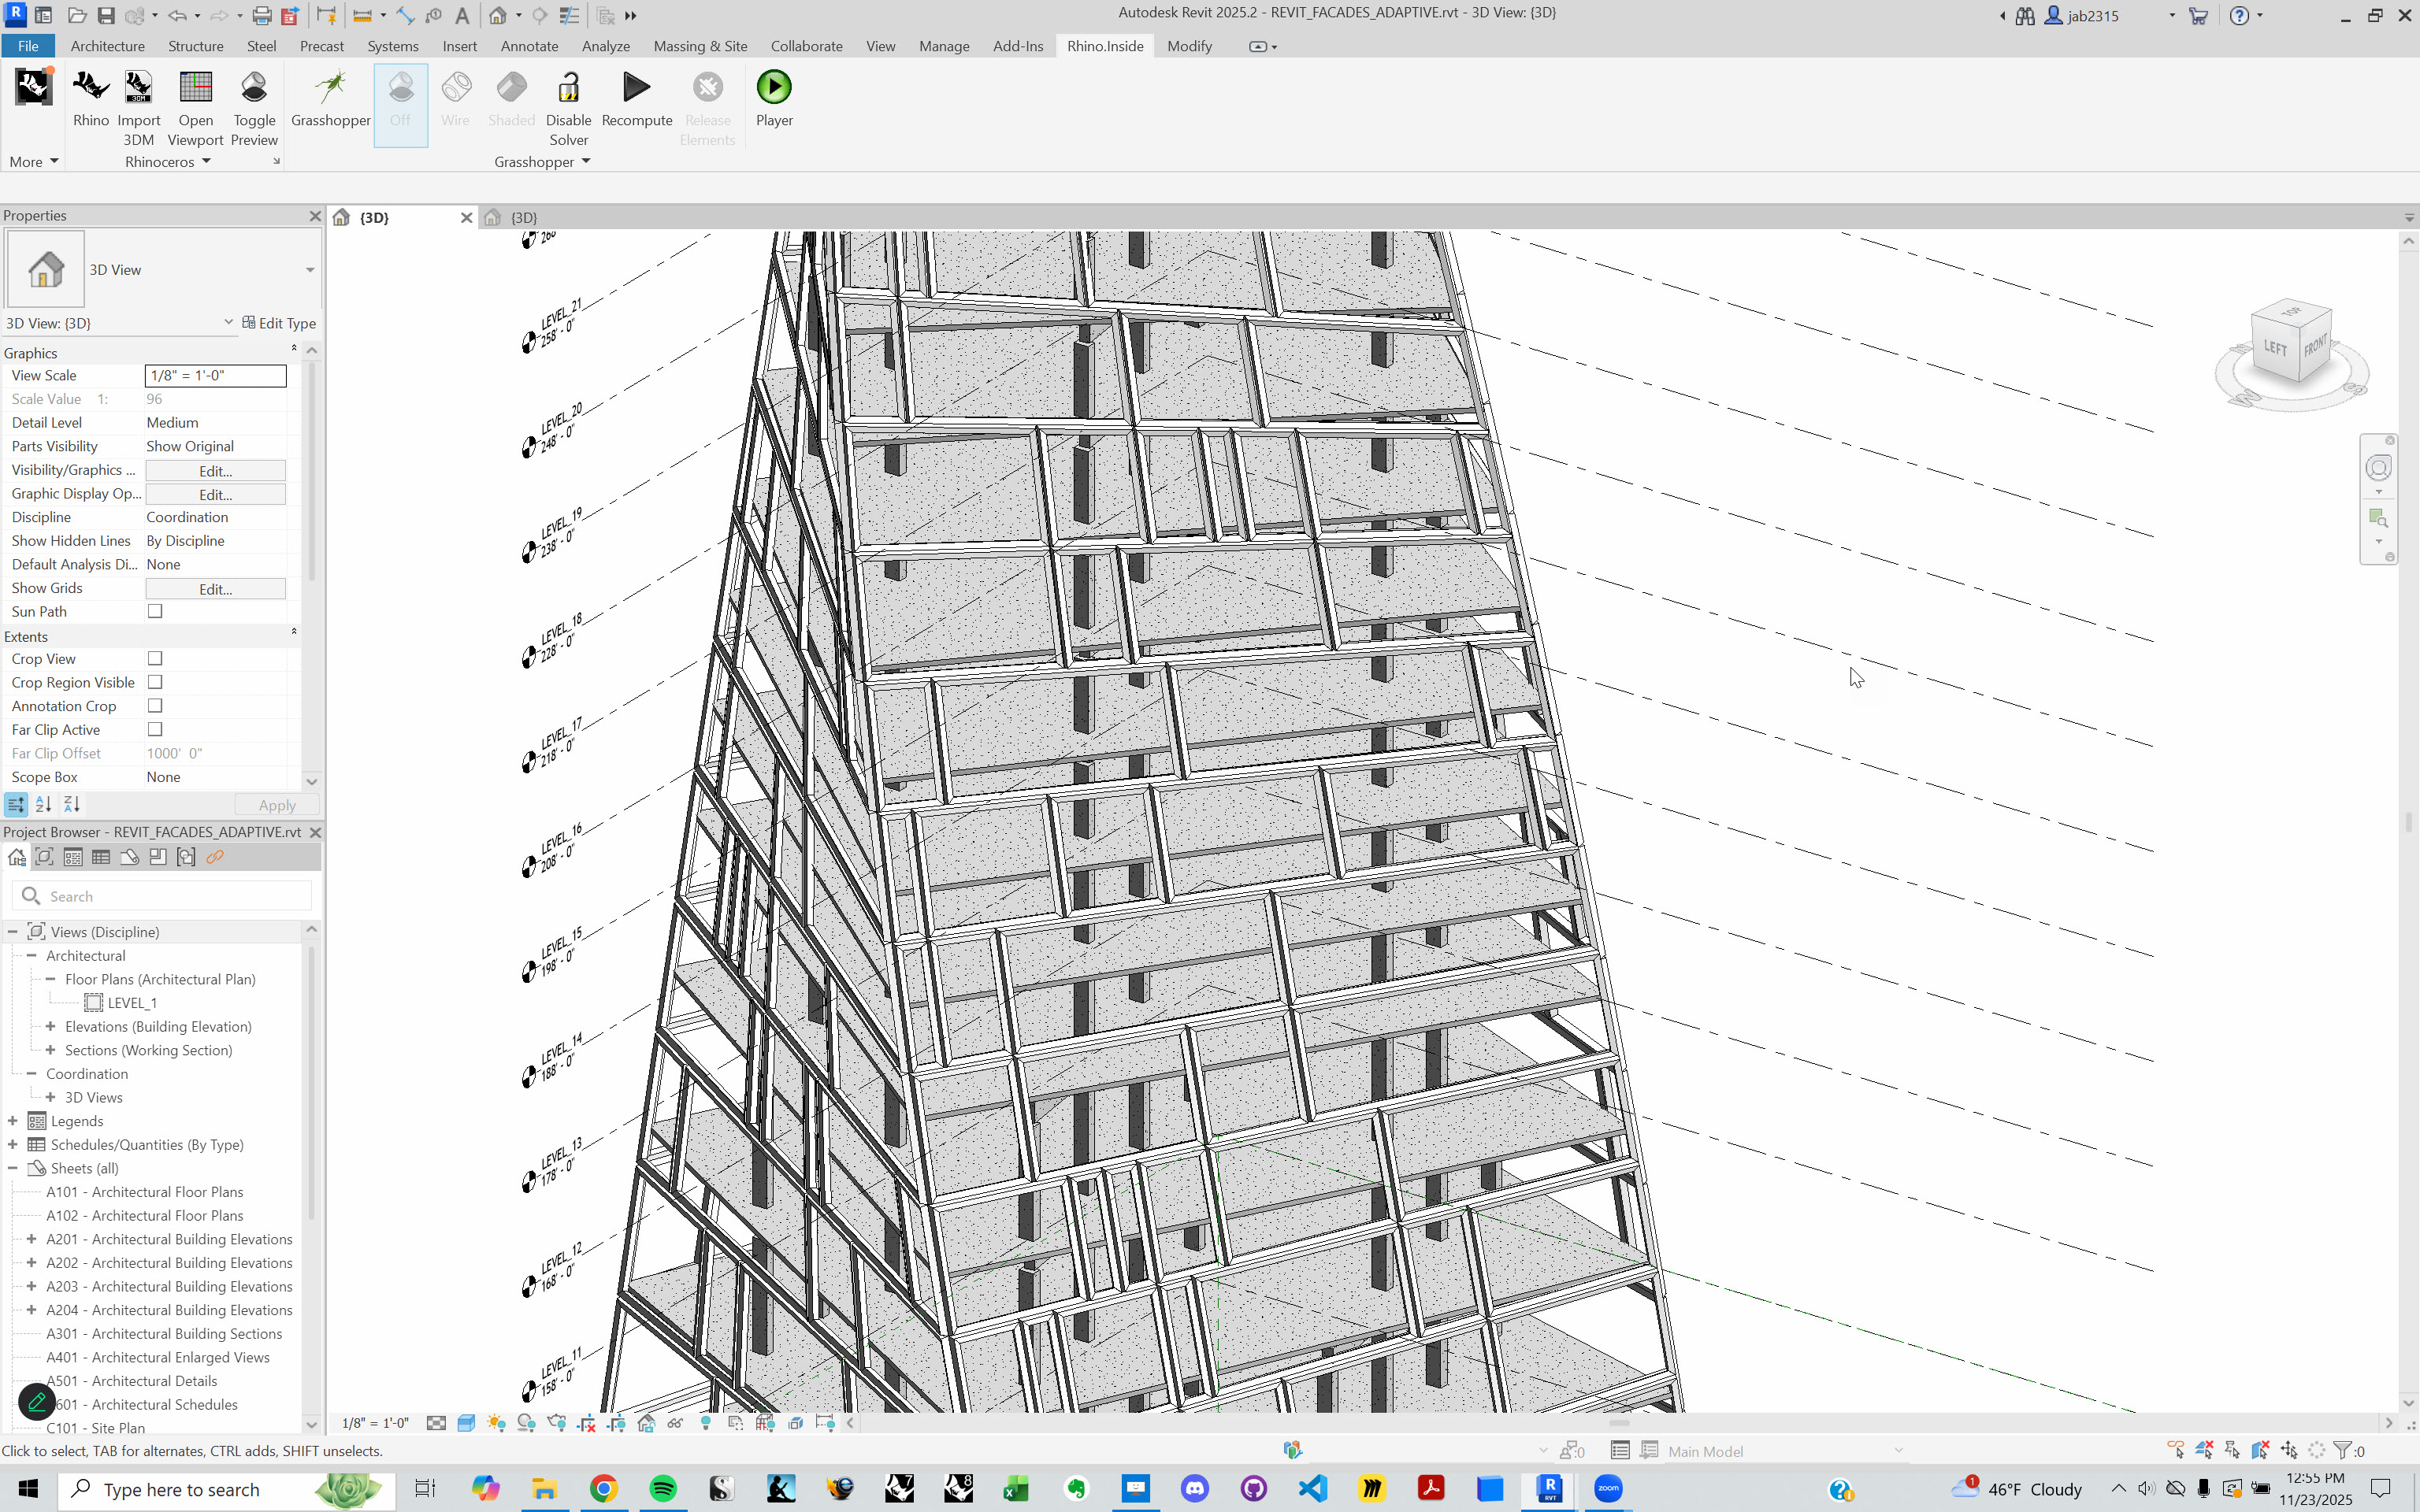
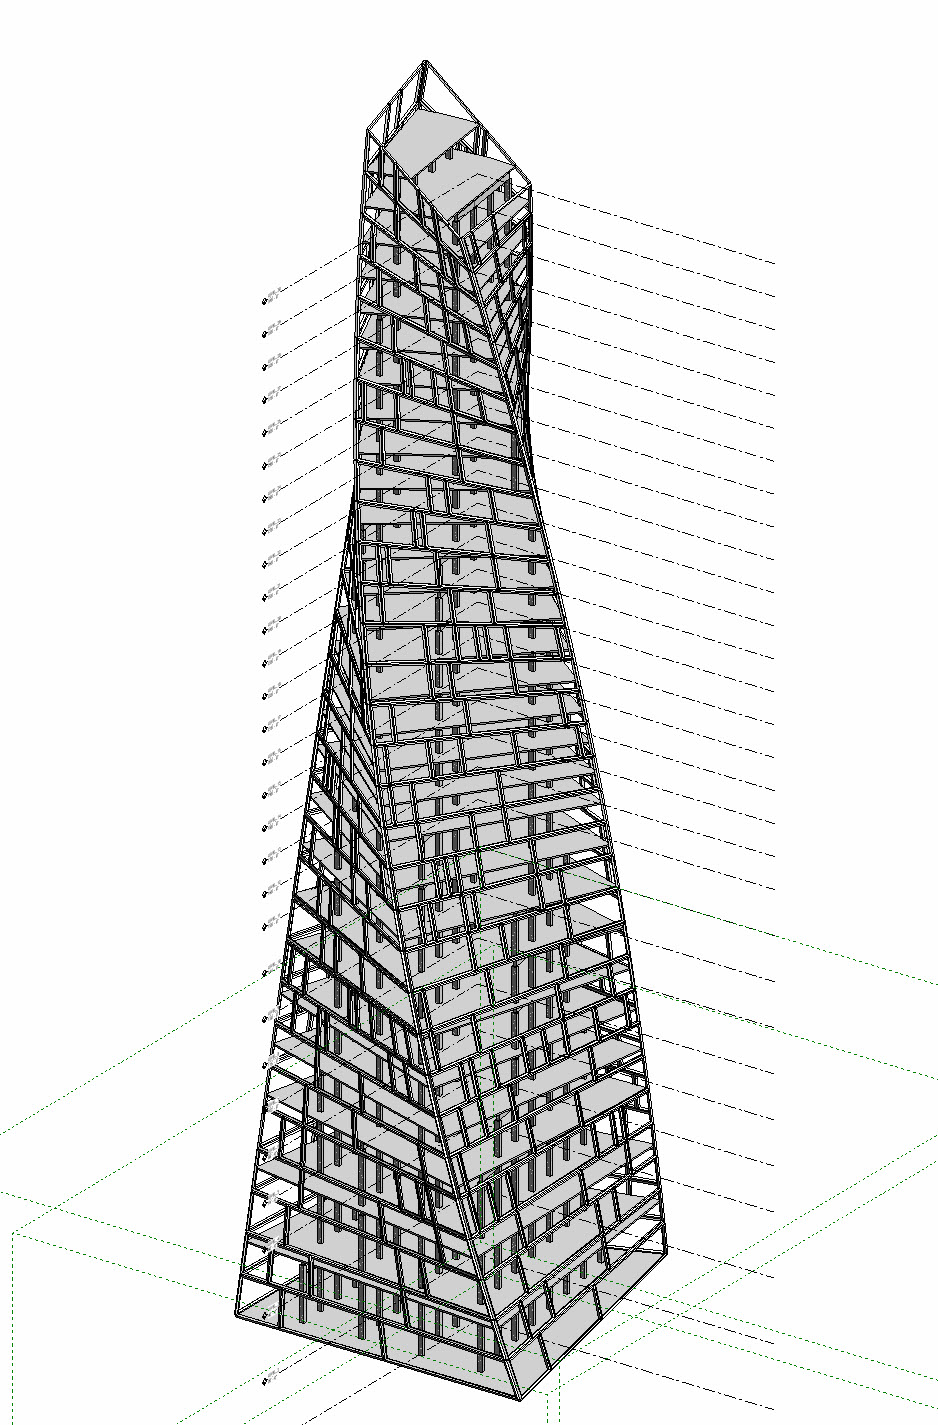
You should now see a smoothly twisting façade of adaptive curtain panels, following the underlying mass in both plan and section curvature.
You can download the final working file here: https://drive.google.com/file/d/1kEmHCg0OQzcHSV99kwI6QpAGrvilqbfz/view?usp=sharing
Optional explorations
- Replace quadrilateral panels with triangles (3-point adaptive).
- Try hexagonal or other polygonal families.
8. Wrap-Up
In this module we:
- Reset the model to avoid Rhino.Inside conflicts.
- Used Evaluate Surface and vector logic to isolate vertical surfaces.
- Panelized the surfaces using Lunchbox based on approximate design sizes.
- Extracted four corner points per panel.
- Built a Revit adaptive curtain panel family.
- Used Grasshopper’s Add Component Adaptive to populate a highly curved tower.
Once your adaptive family and GH definition are clean, this workflow gives you enormous flexibility — perfect for real-world complex projects that don’t fit neatly into Revit’s system family logic.
Side Challenge: Triangular Adaptive Panels
Try creating a 3-point adaptive panel instead:
- Build a new triangular adaptive family in Revit.
- Split each quad panel into two triangles in Grasshopper.
- Feed each triangle’s 3 points into Add Component Adaptive.
Post a screenshot or GIF in the class Slack when you get it working.
